okamuuu.com を Gatsby と Netlify に移行しました

Gatsby x Netlify
あらすじ
先日まで okamuuu.com を Google App Engine 上で Go と React.js で運用していましたが github.com の gh-pages に移動しました。Google App Engine を使う案件にアサインされていたので練習のために運用しようと思ったのですが案件が終了したのでとりあえずお役目御免にしました。
あと、諸事情で okamuuu.com から www.okamuuu.com へ変えました。
Gatsby
日本人男性だと Gatsby は整髪料のアレを連想すると思いますが Static Generator です。markdown でブログを書くアレだと言えば話は早いのですが、類似のツールと違う点として Template Engine が React であるということです。
xxxx.md といった makrdown あるいは xxxx.js といった React Components をそのまま記事にする事ができるので、割と自由にカスタマイズをする事ができます。最近 React にはまっていて、オレオレ React Components を作りたい今日この頃の私にとっては涎が出るような Static Generator です
Just Do it
gatsby のインストールとプロジェクトの作成。プロジェクトの作成にやや時間がかかります。
npm install -g gatsby
gatsby new okamuuu.com2 https://github.com/gatsbyjs/gatsby-starter-blog
開発サーバーを起動
cd okamuuu.com2
gatsby develop
open "http://localhost:8000" で画面を確認します。
記事一覧表示を日付の新しい順にする
pages/index.js を以下のように修正します。
 import React from 'react'
 import { Link } from 'react-router'
 import sortBy from 'lodash/sortBy'
+import reverse from 'lodash/reverse'
 import get from 'lodash/get'
 import { prefixLink } from 'gatsby-helpers'
 import { rhythm } from 'utils/typography'
@@ -12,7 +13,7 @@ import Bio from 'components/Bio'
 class BlogIndex extends React.Component {
   render () {
     // Sort pages.
-    const sortedPages = sortBy(this.props.route.pages, 'data.date')
+    const sortedPages = reverse(sortBy(this.props.route.pages, 'data.date'))
     // Posts are those with md extension that are not 404 pages OR have a date (meaning they're a react component post).
     const isPublished = page => (get(page, "data.isPublished"))
     const visiblePages = sortedPages.filter(isPublished).filter(page => (
記事に下書き機能を追加する
pages/index.js を以下のように修正します。
@@ -14,7 +14,8 @@ class BlogIndex extends React.Component {
     // Sort pages.
     const sortedPages = sortBy(this.props.route.pages, 'data.date')
     // Posts are those with md extension that are not 404 pages OR have a date (meaning they're a react component post).
-    const visiblePages = sortedPages.filter(page => (
+    const isPublished = page => (get(page, "data.isPublished"))
+    const visiblePages = sortedPages.filter(isPublished).filter(page => (
       get(page, 'file.ext') === 'md' && !include(page.path, '/404') || get(page, 'data.date')
     ))
記事を追加
すでに作成されている記事をコピーします。
mkdir pages/articles
cp pages/2015-05-01-hello-world/index.md pages/articles/index.md
記事の冒頭を以下のように修正します。本文は適宜変更してください
 ---
-title: Hello World
-date: "2015-05-01T22:12:03.284Z"
-readNext: "/my-second-post/"
-path: "/hello-world/"
+title: "Using Bootstrap4 with React"
+date: "2016-12-25T00:00:00.284Z"
+isPublished: true
+path: "/articles/using-bootstrap4-with-react/"
config を修正
-blogTitle = "My Awesome Blog"
-authorName = "Kyle Mathews"
-linkPrefix = "/gatsby-starter-blog"
+blogTitle = "okamuuu.com"
+authorName = "okamuuu"
+linkPrefix = ""
Bio component を修正
Profile 画像を修正します。ここでは Gravatar を使います。
npm install --save
Netlify へアップロード
もしくは CLI を使ってデプロイも可能です。その場合は gatsby build であらかじめ静的ファイルを作成しておく必要があります。
npm install netlify-cli -g
gatsby build
netlify deploy
? No site id specified, create a new site Yes
? Path to deploy? (current dir) public
Deploying folder: public
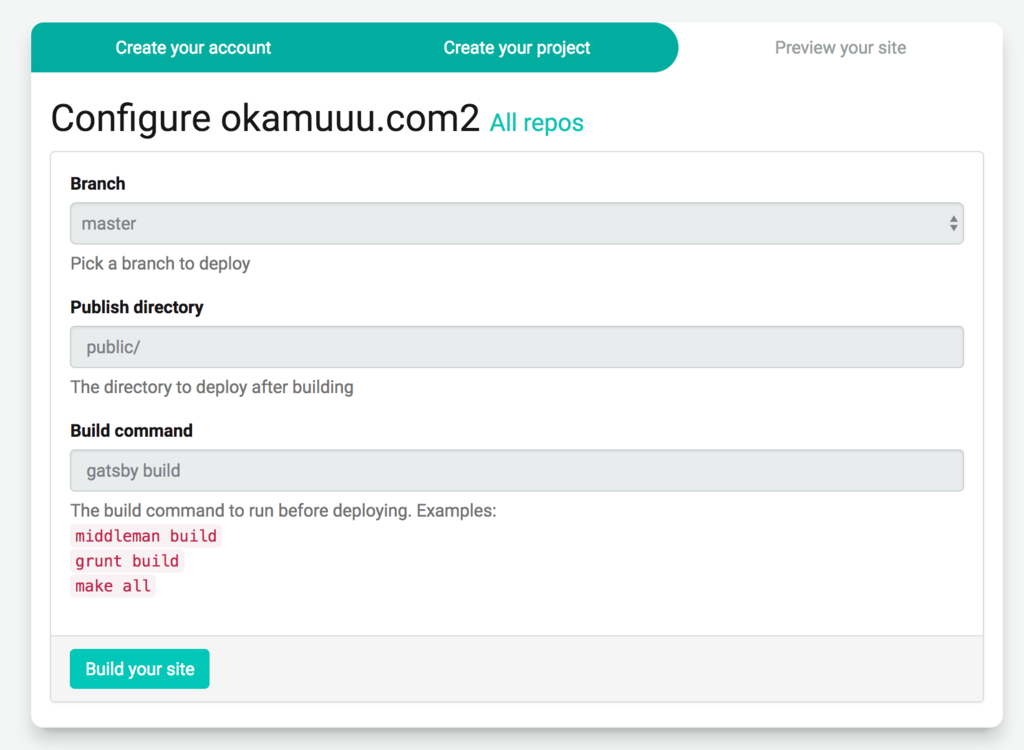
注意点としては netlify deploy で対話モードが始まるのでデプロイするディレクトリを public に指定します。
このコマンドが実行されると設定ファイル .netlify が生成されて、以後 netlify update を実行するだけで build したファイルが upload されます。
もしくは Github と repository を Linking する方法もあります。 master branch への upload がトリガーになって Netlify 上で gatsby build が実行されます。
まとめ
静的ファイルの配信であれば Github page や S3 といった選択肢ががあるとおもいますが Netlify は無料のSSL/HTTPS が提供されているところが今の所、頭ひとつ出ている感がします。
Gastby はテキスト主体の記事は markdown で記述して、動的な処理を埋め込みたい時に Javascript(React Component) で記事を記述する事ができるので React.js を使っているエンジニアにとってはとても面白い CMS だと思います。
おしまい